How to Reduce Media Waste with Automated Nesting
September 11, 2026
Are you a large-format printer? Then you already know where the real waste hides. You notice that it does not always manifest itself in the obvious stuff. It can be a part of a vinyl left beside a run, a weird gap between two irregular shapes, a sheet that was not fully used, or even the extra margin you needed just in case.
If multiplied, these problems can become a real waste to your shop, and your entire year of production can be impacted. As a result, you will start thinking of the money you’ve wasted on this. This article introduces you to automated nesting which helps you position more jobs into the same amount of media while spending less time figuring out how to arrange them.
If you work with vinyl, textiles, boards, labels, decals, packaging, signage, or other substrates, introducing better nesting into your workflow will turn media utilization into a measurable production advantage.
What Is Nesting in Printing?
In large-format printing, nesting is the process of organizing multiple print jobs or shapes together as efficiently as possible on a sheet, roll, or other substrate. You can think of it as packing a suitcase, you can put everything in and you hope you can close it at the end or you can use the available space effectively and in a smart way.
In printing, you encounter the same problem, except that the suitcase we talked about will be expensive media, and every empty space has a cost. Previous layouts often use simple rows and columns and this works great when every job you submit is rectangualr and identical. But the reality is not that cooperative, and you need more time to process irregular files:
You might have:
- Contour-cut stickers
- Irregular signage
- Labels of different sizes
- Vehicle graphics
- Textile panels
- Decals
- POS displays
- Packaging components
- Multiple customer jobs sharing one sheet or roll
In these cases, advanced nesting strategies are a valuable asset. You can see how much of this media you can use and avoid trying to know how many pieces will actually fit.
The Hidden Cost of Poor Nesting
It’s always easy to underestimate madia waste because it always arrives in chunks and will accumulate quietly. So, at first, you don’t really know if you’re wasting too much or not. Let’s say your job requires 10m2 of printed media.
In the case that your layout utilizes 10m2, this will be a straightforward process. On the opposite side, and in case you apply an inefficient positioning, you will be using more than 10m2, and pay for the extra media used that will never be part of the final result.
This is an example for one specific job, but in reality, you will be doing the same thing for all your jobs.
A simple example
Let’s say your production operation runs in this way:
- 500 m² of media per week
- An average of 12% avoidable layout waste
- 50 working weeks per year
That represents approximately:
3,000 m² of media consumed without becoming a sellable result. And of course, this is before taking into account all the ink used, finishing, labor, storage, handling, and the environment cost associated with producing and disposing of unused material.
The accurate effect will be different according to workflow, media, job mix, and nesting procedures. But the rule stays the same: if your improve your media utilization when production volumes are high, you can see that every improved percentage will matter in the end of production?
Why Printers Lose Material to the Layout
Once you start thinking about reducing waste, you should know that you can’t avoid it 100%. Sometimes, you need margins and spacing. It also happens that some materials have grain or directional requirements , or that some finishing processes require additional room.
That’s why you have to first understand that we’re not trying to eliminate every square centimeter of waste. We’re trying to help you eliminate the waste you don’t need. And this can be a hard process when you do it manually. You might spend minutes or more moving shapes around, rotating them, testing different combinations, checking dimensions, and trying to make everything fit.
And let’s say you’re doing that for dozens of jobs, and that’s how you create other problems that won’t be easily controlled
From “Fit It On the Sheet” to True-Shape Nesting
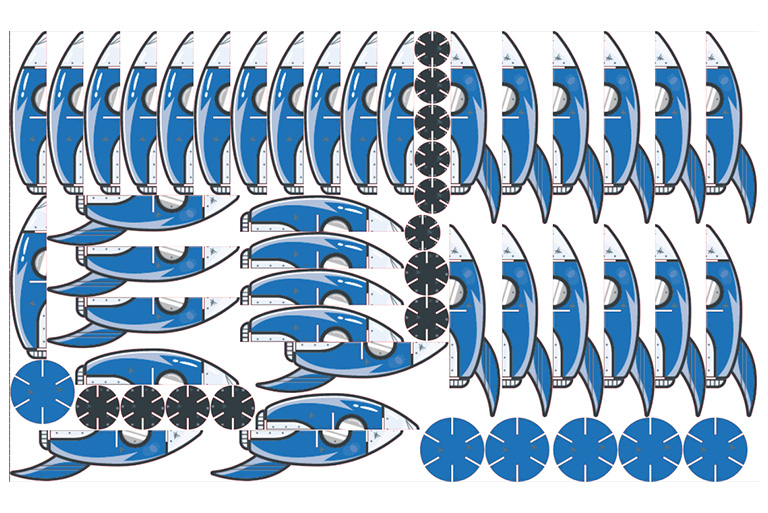
Now, we will introduce you to the difference between basic nesting and true-shape nesting. The former may treat jobs as rectangles while the latter detects the actual geometry of the objects and creates more opportunities for you to use the available media. Let’s say you have two irregular shapes.
In the case where you treat them both as rectangles, the unused corners become dead space. On the other hand and if the software understands the actual contours, one shape may be able to occupy space around another.
True-shape nesting can account for:
- Object contours
- Rotation
- Different object dimensions
- Spacing requirements
- Bleed and margins
- Material dimensions
- Production constraints
- Multiple jobs within the same layout
As a result, you will be using the media more efficiently without requiring an operator to manually experiment with every possible arrangement.
How Automated Nesting Works
When using automated nesting, you don’t need to do the manual adjustements that lead to more trials and errors. A nesting software like Caldera PrimeCenter analyzes the available jobs and determines how they can be arranged within the defined production constraints.
Here is what your workflow will be:
1. Gather the jobs: The software receives the print-ready files or production jobs that need to be processed
2. Understand the geometry: It identifies the dimensions and shapes that need to be placed
3. Apply production rules: Spacing, margins, media width, rotation restrictions, bleed, and other requirements can be taken into account
4. Calculate possible layouts: The nesting engine evaluates different arrangements to find a more efficient use of the available substrate
5. Create the production layout: Jobs are grouped into a layout ready for the next stage of the print workflow
6. Send it downstream: The completed layout can then move into the RIP and production process according to your workflow
Automated Nesting Doesn’t Just Save Media
In addition to the above-mentioned advantages of automated nesting, it offers more at the level of production and affects several parts of your production.
Less media waste: More efficient layouts mean less unused substrate between and around jobs
Fewer manual layout decisions: Operators don’t have to spend as much time figuring out where every job should go
Better production planning: Grouping compatible jobs together can make production more predictable
More jobs per layout: Efficient layouts can allow more work to share the same sheet or section of roll
Less repetitive work: The operator can spend less time performing the same positioning tasks over and over
Substrate Utilization: The Metric Printers Should Watch
To reduce waste and if you’re seriously considering it, you have to track how much of your media becomes useful output and how much you purchase.
Media utilization is essentially the relationship between the material available and the material actually used for the intended production result.
For example, if a layout uses 9 m² of a 10 m² available area for sellable objects, utilization is approximately 90%.
The exact calculation depends on how your operation defines usable area, waste, margins, and production constraints.
But whatever methodology you choose, consistency is the key element. Once you measure it, you can start investigating better:
- Which jobs generate the most waste?
- Which media types have the lowest utilization?
- How much waste comes from layout?
- How much is required for finishing?
- How much is simply unused space?
- How much operator time goes into manual nesting?
- Which jobs could be combined?
Manual Nesting vs. Automated Nesting
This comparison does not allude that manual nesting is bad or that you should change it. It can be a perfect choice when treating a small number of simple jobs. Using it, an operator can often create a perfectly reasonable layout.
But once you decide to take more jobs and scale your business, you might need to integrate automated nesting.
As job volume, shape complexity, and media costs increase, manual optimization becomes increasingly difficult.
Manual Nesting
Automated Nesting
Your goal will not be focused on replacing your operators’ knowledge. Instead, you will give them a better production system to apply that knowledge.
When Does Automated Nesting Make the Biggest Difference?
There isn’t one magic production profile where nesting suddenly becomes worthwhile. But the potential benefits generally increase when you have:
High material costs: The more expensive the substrate, the more significant unnecessary waste becomes
High job volume: Small inefficiencies repeated hundreds of times can become substantial
Irregular shapes: The more complicated the geometry, the harder it is to arrange manually
Mixed-size jobs: Different dimensions create more opportunities, and more complexity
Short-run production: When many small jobs need to be produced, combining them efficiently can become especially useful
Multiple media types: Different widths, lengths, and substrates create additional planning challenges
How to Improve Substrate Utilization
Nesting is just one single part of the printing process. To improve overall substrate utilization, look at the entire workflow.
1. Measure your current waste: You can’t improve what you don’t measure. Track media consumed versus useful output and identify where the biggest losses occur
2. Group compatible jobs: Where your workflow allows it, combining jobs can reduce unused space
3. Use the actual object shape: Don’t waste valuable substrate around invisible rectangular boundaries when the finished object has a very different contour
4. Allow intelligent rotation: Depending on the substrate and finishing requirements, rotating objects can open up additional layout possibilities.
5. Standardize production rules: Define minimum gaps, margins, bleed requirements, and other constraints so optimization doesn’t come at the expense of finishing or print quality
6. Automate repetitive decisions: If operators repeatedly perform the same layout calculations, that’s a good candidate for automation
7. Review the results: Optimization shouldn’t be a black box. Look at media savings, job throughput, operator time, and production outcomes to understand whether the workflow is actually improving.
Waste Is a Workflow Problem
You are not wasting media because you’re using too much or because you use more than what you need. It’s always tempting to think that way. But if you look further, you might find that the root cause is different. A job enters the workflow, it gets prepared, someone positions it, another job comes along, the operator adjusts the layout; then they will receive another job, then another.
By the end of the week, all those tiny decisions have become a measurable amount of wasted material. When you optimize nesting, it treats the problem at the layout stage before the media reaches the printer. So, you don’t need to print less to be able to avoid waste. The key is to make better use of what you’re already printing on.
What Automated Nesting Should Really Deliver
When we talk about automated nesting, we talk about many advantages and not only the aesthetics of layouting. The goal isn’t simply to produce a prettier layout. A useful nesting solution should fit into the realities of a production environment.
It should help you answer:
Can I get more finished output from the same media?
Can my operators spend less time manually arranging jobs?
Can I make better use of irregular shapes?
Can I combine more jobs efficiently?
Can I reduce unnecessary offcuts without compromising production requirements?
If the answer to those questions is yes, nesting becomes a practical production tool.
Turning Every Roll Into More Sellable Productions
Printers don’t buy media to throw it away. They buy it to turn it into signs, graphics, labels, textiles, displays, decals, packaging, and finished products that customers pay for. As a result, this makes every unused section of media worth looking at. Automated nesting won’t eliminate every source of waste because some waste is unavoidable and some is required by the production process.
But you can avoid the waste, it means you’re optimlizing your layout and that’s why we talk about optimization when we talk about nesting. Optimization problems are exactly the kind of problems software is good at solving.

Frequently asked questions
Nesting is the process of arranging multiple print jobs or objects efficiently on a sheet, board, roll, or other substrate. The goal is to minimize unused space, improve material utilization, and create an efficient production layout.
There is no universal percentage, as waste depends on factors such as object shapes, media size, spacing, and production requirements. Even small inefficiencies can add up significantly in high-volume production.
Start by measuring your current material usage and identifying where waste occurs. Combining compatible jobs, optimizing rotation, using true object shapes, reducing unnecessary gaps, and automating nesting can all help improve substrate utilization.
True-shape nesting arranges objects according to their actual contours rather than simple rectangular boundaries. This allows irregular shapes to fit closer together and can make better use of otherwise unused areas of the substrate.
Automated nesting software analyzes the objects, available substrate, and production requirements, then calculates an efficient layout. It can consider factors such as rotation, spacing, margins, bleed, and media width to create a production-ready arrangement.
It depends on your workflow. For simple, rectangular jobs, manual nesting may be sufficient. For irregular shapes, mixed-size jobs, short runs, or expensive media, automated nesting can provide greater value by potentially saving both material and operator time.
Potentially, yes. Automated nesting can reduce manual positioning and trial-and-error while also improving material utilization. This can mean fewer offcuts and less time spent preparing jobs for production.
Related articles